spring-boot-mybatis-web-开发环境搭建
Spring Boot 是什么
官网对他的介绍是:
Spring Boot 使您能轻松地创建独立的、生产级的、基于 Spring 且能直接运行的应用程序。我们对 Spring 平台和第三方库有自己的看法,所以您从一开始只会遇到极少的麻烦。
我对Spring Boot的理解是:
大家都喜欢使用Spring进行开发,但是配置一个基于Spring 开发的项目是在有些复杂,而Spring Boot所做的工作就是将Spring开发时常用的,主流的框架集合进行二次封装,使得配置工作变得简单。
Spring Boot拥有合理(主流)的默认配置,例如:默认情况下,Spring Boot Web应用程序内嵌了一个Tomcat容器。
当然你也可以禁用其默认配置并自己添加新的配置,这个过程也十分简单。
环境搭建
前提:
本文使用:Idea + maven.
正式开始!
1.首先打开idea,点击File->new->project.
在出现的页面中点击Spring initializr。点击next。
2.在接下来的页面配置你的项目名称信息。点击next。
3.在dependenice页面中,选中web栏下的web,SQL栏下的JPA,Mybatis,MySQL。之后一路点击next完成项目创建。
4.配置pom.xml文件。
我的完整pom.xml为:
1
2
3
4
5
6
7
8
9
10
11
12
13
14
15
16
17
18
19
20
21
22
23
24
25
26
27
28
29
30
31
32
33
34
35
36
37
38
39
40
41
42
43
44
45
46
47
48
49
50
51
52
53
54
55
56
57
58
59
60
61
62
63
64
65
66
67
68
69
| <?xml version="1.0" encoding="UTF-8"?>
<project xmlns="http://maven.apache.org/POM/4.0.0"
xmlns:xsi="http://www.w3.org/2001/XMLSchema-instance"
xsi:schemaLocation="http://maven.apache.org/POM/4.0.0 http://maven.apache.org/xsd/maven-4.0.0.xsd">
<modelVersion>4.0.0</modelVersion>
<groupId>com.huyan</groupId>
<artifactId>configcenter</artifactId>
<version>0.0.1-SNAPSHOT</version>
<packaging>jar</packaging>
<name>configcenter</name>
<description>Demo project for Spring Boot</description>
<parent>
<groupId>org.springframework.boot</groupId>
<artifactId>spring-boot-starter-parent</artifactId>
<version>2.0.1.RELEASE</version>
<relativePath/> <!-- lookup parent from repository -->
</parent>
<properties>
<project.build.sourceEncoding>UTF-8</project.build.sourceEncoding>
<project.reporting.outputEncoding>UTF-8</project.reporting.outputEncoding>
<java.version>1.8</java.version>
</properties>
<dependencies>
<dependency>
<groupId>org.springframework.boot</groupId>
<artifactId>spring-boot-starter-data-jpa</artifactId>
</dependency>
<dependency>
<groupId>org.springframework.boot</groupId>
<artifactId>spring-boot-starter-data-redis</artifactId>
</dependency>
<dependency>
<groupId>org.springframework.boot</groupId>
<artifactId>spring-boot-starter-web</artifactId>
</dependency>
<dependency>
<groupId>org.mybatis.spring.boot</groupId>
<artifactId>mybatis-spring-boot-starter</artifactId>
<version>1.3.2</version>
</dependency>
<dependency>
<groupId>mysql</groupId>
<artifactId>mysql-connector-java</artifactId>
<scope>runtime</scope>
</dependency>
<dependency>
<groupId>org.springframework.boot</groupId>
<artifactId>spring-boot-starter-test</artifactId>
<scope>test</scope>
</dependency>
</dependencies>
<build>
<plugins>
<plugin>
<groupId>org.springframework.boot</groupId>
<artifactId>spring-boot-maven-plugin</artifactId>
</plugin>
</plugins>
</build>
</project>
|
5.配置application.yml文件。
这是spring boot 的配置文件,在resources目录下新建文件,文件名为:application.yml.然后在其中配置数据库:
1
2
3
4
5
6
7
| spring:
# 数据库配置
datasource:
url: jdbc:mysql://localhost:3306/config_center?useUnicode=true&characterEncoding=utf8&zeroDateTimeBehavior=convertToNull&useSSL=false
username: {your.username}
password: {your.password}
driver-class-name: org.gjt.mm.mysql.Driver
|
将其中的username和password换成你自己的数据库信息。
6.在你的mysql数据库中新建数据库config_center。
7.此时,在包主目录下找到Application类(名字和你的包名有关系),run,会发现tomcat已经启动成功。

8.在pox.xml中已经加入了对mybatis-spring-boot-starter的依赖,所以我们只需要在yml文件中添加以下内容。
1
2
3
4
5
6
| # mybatis配置
mybatis:
# 配置映射类所在包名
type-aliases-package: panfeng.configcenter.model
# 配置mapper xml文件所在路径
mapper-locations: classpath:mapper/**.xml
|
9.好了,现在基于spring boot 及mybatis的web环境已经搭建完成。让我们来测试以下。
首先,在数据库中添加一张表,我添加了一张名为ldap_account的表。然后使用myvatis generator自动生成与之对应的model,mapper层(当然你可以手写,只是有点麻烦)。
然后在项目下建立如下目录。
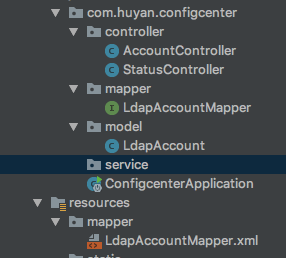
这里由于偷懒所以没有写service层代码,在controller层中直接调用了mapper层。
StatusController代码:
1
2
3
4
5
6
7
8
9
10
11
12
13
14
15
16
17
18
19
20
21
22
23
| package com.huyan.configcenter.controller;
import com.alibaba.fastjson.JSONObject;
import org.springframework.stereotype.Controller;
import org.springframework.web.bind.annotation.RequestMapping;
import org.springframework.web.bind.annotation.RequestMethod;
import org.springframework.web.bind.annotation.ResponseBody;
@Controller
public class StatusController {
@RequestMapping(value = "/status", method = RequestMethod.GET,
produces = {"application/json;charset=UTF-8"})
@ResponseBody
public JSONObject status() {
JSONObject jsonObject = new JSONObject();
jsonObject.put("server_name", "config-center");
jsonObject.put("status", "ok");
return jsonObject;
}
}
|
AccountController代码:
1
2
3
4
5
6
7
8
9
10
11
12
13
14
15
16
17
18
19
20
21
22
23
24
25
26
27
28
29
30
31
| package com.huyan.configcenter.controller;
import com.alibaba.fastjson.JSONObject;
import com.huyan.configcenter.mapper.LdapAccountMapper;
import com.huyan.configcenter.model.LdapAccount;
import javax.annotation.Resource;
import org.springframework.stereotype.Controller;
import org.springframework.web.bind.annotation.RequestMapping;
import org.springframework.web.bind.annotation.RequestMethod;
import org.springframework.web.bind.annotation.ResponseBody;
@Controller
public class AccountController {
@Resource
private LdapAccountMapper ldapAccountMapper;
@RequestMapping(value = "/account}", method = RequestMethod.GET,
produces = {"application/json;charset=UTF-8"})
@ResponseBody
public JSONObject status() {
JSONObject jsonObject = new JSONObject();
LdapAccount ldapAccount = ldapAccountMapper.selectByPrimaryKey(1);
jsonObject.put("id", ldapAccount.getId());
jsonObject.put("name", ldapAccount.getLdapName());
jsonObject.put("phone",ldapAccount.getLdapPhine());
return jsonObject;
}
}
|
10.测试一下:
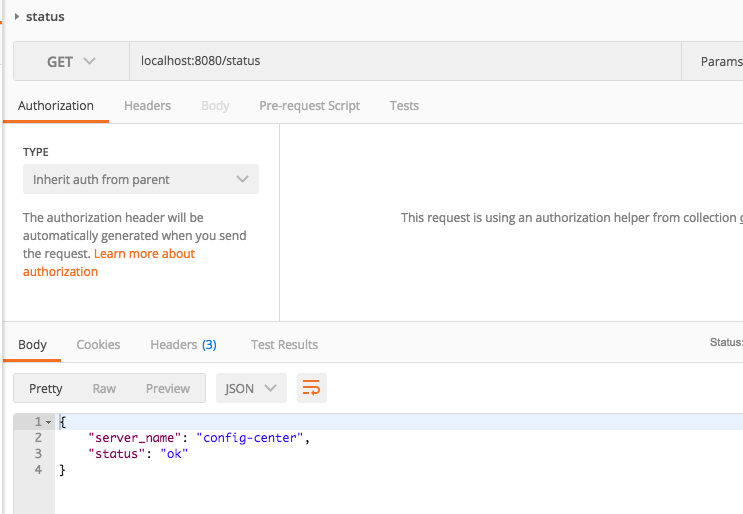
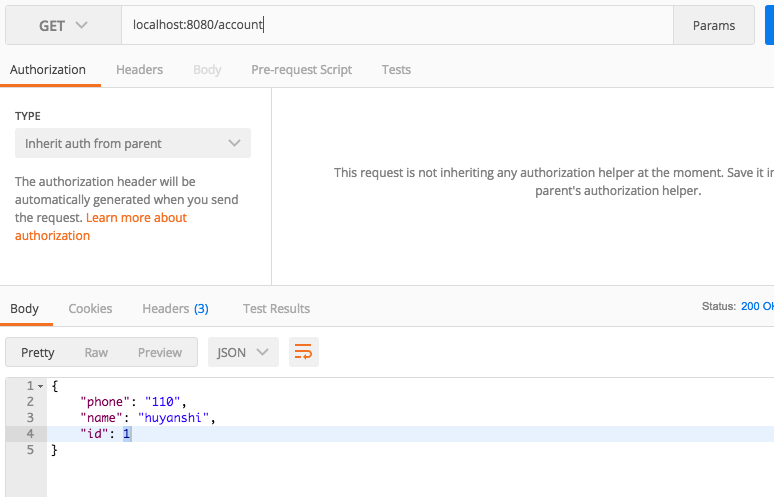
ok,大功告成,在各层中添加你的代码吧!
ChangeLog
2018-04-08 完成
以上皆为个人所思所得,如有错误欢迎评论区指正。
欢迎转载,烦请署名并保留原文链接。
联系邮箱:huyanshi2580@gmail.com
更多学习笔记见个人博客——>呼延十

