HashMap是什么想必大家都是知道的,日常开发中经常使用,而且常驻于笔试题目及面试中,那么今天将从源码的角度来深入理解一下HashMap。
PS:本文以下分析基于jdk1.7,1.8的改动会在文后总结。
1.什么是HashMap? HashMap是基于哈希表的Map接口实现,是一个key-value型的数据结构。他在性能良好的情况下,存取的时间复杂度皆为O(1).
要知道数组的获取时间复杂度为O(1),但是他的插入时间复杂度为O(n).
那么HashMap是怎么做到的呢?
看一下HashMap的属性:
1 2 3 4 5 6 7 8 9 10 11 12 13 14 15 16 17 18 19 20 21 22 23 24 25 26 27 28 29 30 31 32 33 34 35 36 37 38 39 40 41 42 43 static final int DEFAULT_INITIAL_CAPACITY = 1 << 4 ; static final int MAXIMUM_CAPACITY = 1 << 30 ; static final float DEFAULT_LOAD_FACTOR = 0.75f ; static final Entry<?,?>[] EMPTY_TABLE = {}; transient Entry<K,V>[] table = (Entry<K,V>[]) EMPTY_TABLE; transient int size; int threshold; final float loadFactor; transient int modCount; static final int ALTERNATIVE_HASHING_THRESHOLD_DEFAULT = Integer.MAX_VALUE; transient int hashSeed = 0 ; private transient Set<Map.Entry<K,V>> entrySet = null ; private static final long serialVersionUID = 362498820763181265L ;
注释已经比较完备,便不再做过多的说明。
由里面的
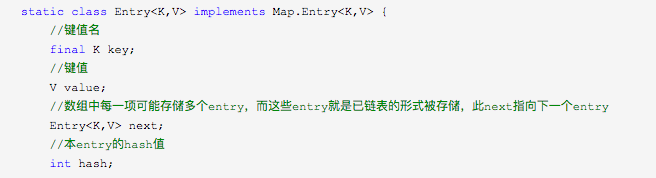
可以看出,HashMap的主体其实是个数组,是Entry这个内部类的数组。
Entry内部类是啥呢?
这是Entry内部类的属性,可以看出这是个单链表的节点,因为它内部有指向下一个节点的next。
那么就相当明了了,HashMap内部是一个数组,数组的每一个节点是一个链表的头结点 ,也就是拉链式。
2.HashMap具体是怎么做到的 对于HashMap来说,日常使用的就是两个方法,get(),put().
我们首先看put. 1 2 3 4 5 6 7 8 9 10 11 12 13 14 15 16 17 18 19 20 21 22 23 24 25 26 27 28 29 30 31 32 33 34 35 36 37 38 39 40 41 42 43 44 45 46 47 48 49 50 51 52 53 54 55 56 57 58 59 60 61 62 63 64 65 public V put (K key, V value) { if (table == EMPTY_TABLE) { inflateTable(threshold); } if (key == null ) return putForNullKey(value); int hash = hash(key); int i = indexFor(hash, table.length); for (Entry<K,V> e = table[i]; e != null ; e = e.next) { Object k; if (e.hash == hash && ((k = e.key) == key || key.equals(k))) { V oldValue = e.value; e.value = value; e.recordAccess(this ); return oldValue; } } modCount++; addEntry(hash, key, value, i); return null ; } private V putForNullKey (V value) { for (Entry<K,V> e = table[0 ]; e != null ; e = e.next) { if (e.key == null ) { V oldValue = e.value; e.value = value; e.recordAccess(this ); return oldValue; } } modCount++; addEntry(0 , null , value, 0 ); return null ; } void addEntry (int hash, K key, V value, int bucketIndex) { if ((size >= threshold) && (null != table[bucketIndex])) { resize(2 * table.length); hash = (null != key) ? hash(key) : 0 ; bucketIndex = indexFor(hash, table.length); } createEntry(hash, key, value, bucketIndex); } void createEntry (int hash, K key, V value, int bucketIndex) { Entry<K,V> e = table[bucketIndex]; table[bucketIndex] = new Entry <>(hash, key, value, e); size++; }
代码中添加了一些注释,大概是可以看懂的,那么这里总结一下流程。
判断当前hashMap是否为空,为空则初始化。
判断传入的key是否为null,为null的话直接放到数组的0位置或者0位置的链表上。
key不为空,计算key的hash值。
计算key在数组中应该存储的下标
遍历数组在该下标的链表,如果找到已经存在的key和传入的key相等,则用新的value替换旧的value。
没找到,则在数组的i位置添加一个Entry。
添加Entry时,先判断是否需要扩容,需要的话扩容,不需要的话下一步。
创建一个Entry,创建的方法是将新传入的key-value放在数组i位置的链表头结点,并且指向原链表头结点。
接下来是get()方法。 1 2 3 4 5 6 7 8 9 10 11 12 13 14 15 16 17 18 19 20 21 22 23 24 25 26 27 28 29 30 31 32 33 34 35 36 37 38 39 40 41 42 public V get (Object key) { if (key == null ) return getForNullKey(); Entry<K,V> entry = getEntry(key); return null == entry ? null : entry.getValue(); } private V getForNullKey () { if (size == 0 ) { return null ; } for (Entry<K,V> e = table[0 ]; e != null ; e = e.next) { if (e.key == null ) return e.value; } return null ; } final Entry<K,V> getEntry (Object key) { if (size == 0 ) { return null ; } int hash = (key == null ) ? 0 : hash(key); for (Entry<K,V> e = table[indexFor(hash, table.length)]; e != null ; e = e.next) { Object k; if (e.hash == hash && ((k = e.key) == key || (key != null && key.equals(k)))) return e; } return null ; }
同样这里总结一下流程:
判断key==null,如果为null,在数组0位置寻找。
key!=null,判断hashMap中存的值数量是否为0,如果为0直接返回null。
计算key的hash值。
计算key应该在数组中的下标。
遍历Entry数组在该位置的链表,寻找与传入key相等的key,并返回值,如果遍历结束找不到,则返回null。
hash()方法和indexOf()方法 大家可能注意到了,在get()和put()方法的实现中,都使用到了这两个方法,那么这里看一下源码:
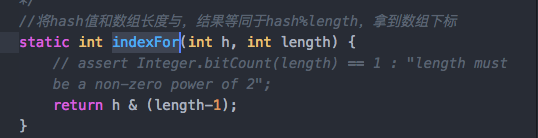
1 2 3 4 5 6 7 8 9 10 11 12 13 14 15 16 17 18 19 20 21 22 23 24 25 final int hash (Object k) { int h = hashSeed; if (0 != h && k instanceof String) { return sun.misc.Hashing.stringHash32((String) k); } h ^= k.hashCode(); h ^= (h >>> 20 ) ^ (h >>> 12 ); return h ^ (h >>> 7 ) ^ (h >>> 4 ); } static int indexFor (int h, int length) { return h & (length-1 ); }
这里重点是:indexOf()方法,将hash值和数组长度与,结果等同于hash%length,拿到数组下标。
结果等同于取模法,但是运算过程更加快速。这里有一个重要的知识点,后续会说噢。
resize()方法 在put()方法及其调用的方法中,当在数组上新添加一个节点时,会判断当前是否需要扩容,怎么判断的呢?
1 2 3 4 5 6 7 8 9 void addEntry (int hash, K key, V value, int bucketIndex) { if ((size >= threshold) && (null != table[bucketIndex])) { resize(2 * table.length); hash = (null != key) ? hash(key) : 0 ; bucketIndex = indexFor(hash, table.length); } createEntry(hash, key, value, bucketIndex); }
可以看到,当当前已经存储值得size大于阀值,则将数组扩容为原来的两倍。
阀值threshold怎么计算呢?容量 * 负载因子。即capacity * loadFactory
扩容的方法为:
1 2 3 4 5 6 7 8 9 10 11 12 13 14 15 16 17 18 19 20 21 22 23 24 25 26 27 28 29 30 31 32 33 34 35 36 37 void resize (int newCapacity) { Entry[] oldTable = table; int oldCapacity = oldTable.length; if (oldCapacity == MAXIMUM_CAPACITY) { threshold = Integer.MAX_VALUE; return ; } Entry[] newTable = new Entry [newCapacity]; boolean oldAltHashing = useAltHashing; useAltHashing |= sun.misc.VM.isBooted() && (newCapacity >= Holder.ALTERNATIVE_HASHING_THRESHOLD); boolean rehash = oldAltHashing ^ useAltHashing; transfer(newTable, rehash); table = newTable; threshold = (int )Math.min(newCapacity * loadFactor, MAXIMUM_CAPACITY + 1 ); } void transfer (Entry[] newTable, boolean rehash) { int newCapacity = newTable.length; for (Entry<K,V> e : table) { while (null != e) { Entry<K,V> next = e.next; if (rehash) { e.hash = null == e.key ? 0 : hash(e.key); } int i = indexFor(e.hash, newCapacity); e.next = newTable[i]; newTable[i] = e; e = next; } } }
新建一个容量为原来两倍的数组,然后将旧数组中的值,rehash之后重新放入新数组,以保证散列均匀。
rehash这个操作是比较费时间的,总的来说扩容操作就比较费时间,因为需要将旧的值移动到新的数组中,因此如果在使用前能预估数量,尽量使用带有参数的构造方法,指定初始容量,尽量避免过多的扩容操作
remove()方法 差点忘记remove()方法了。。
1
2
3
4
5
6
7
8
9
10
11
12
13
14
15
16
17
18
19
20
21
22
23
24
25
26
27
28
29
30
31
32
33
34
35
36
37
38
39
40
41
42
public V remove (Object key) { Entry<K,V> e = removeEntryForKey(key); return (e == null ? null : e.value); } final Entry<K,V> removeEntryForKey (Object key) { if (size == 0 ) { return null ; } int hash = (key == null ) ? 0 : hash(key); int i = indexFor(hash, table.length); Entry<K,V> prev = table[i]; Entry<K,V> e = prev; while (e != null ) { Entry<K,V> next = e.next; Object k; if (e.hash == hash && ((k = e.key) == key || (key != null && key.equals(k)))) { modCount++; size--; if (prev == e) table[i] = next; else prev.next = next; e.recordRemoval(this ); return e; } prev = e; e = next; } return e; }
具体的实现思路也是一样的:首先计算hash继而计算下标,然后遍历数组在该位置的链表,找到该key-value然后将其移除掉。
3.HashMap的一些为什么? 3.1.为什么扩容的阀值在capacity * loadFactory? 首先了解一下
capacity是指容量,数组最大的容量
loadfactory是指负载因子,是形容当前数组装的有多满的一个值。默认为0.75.也就是如果初始capacity为16,那么当不发生hash碰撞,也就是没有用到链表结构时,写入12个元素即会扩容了。
数组在性能上是比链表优秀的(在HashMap中,数组可以存null,不用进行值的移位)。
HashMap的数据结构,导致即使容量只有16,也可以存储32(还可以更多)个值,只需要每个位置上的链表多链几个节点就好了。
因此可以发现,HashMap的性能问题又来到了时间和空间的取舍上,当你不扩容,仍然可以存储,只是由于链表的变长,性能下降。当你进行太多的扩容,hash碰撞减少,链表长度统一减少,性能提高了但是浪费的空间又多了。0.75这个值是开发者定义的一个对时间空间的折中值。
3.2.性能极限的情况 当存入的值越来越多,却不扩容,HashMap性能就会下降,那么我们极限一点。
HashMap的容量只有1,存入了100个值。由上面的分析可知,这时候HashMap退化成了单链表,存取得时间复杂度都是O(n)。
HashMap的容量为16,存入一个值,在存入第二个值,立即扩容,这样可以尽量的避免hash碰撞,避免产生链表,存取时间复杂度都为O(1).
因此,当你对存取速度要求很高,可以适当调低loadfactory,当你当前对速度无所谓,但是内存很小,可是调大loadfactory,当然大部分时候默认值0.75都是一个不错的选择。
loadfactory的值为:0.75,2,4等数字都是合法值
3.3.为什么HashMap的容量永远是2的次幂? 看过上面的代码我们可以发现,HashMap的初始容量为16,扩容为原容量乘以2。
也就是说,HashMap的容量永远是2的次幂,这是为什么呢?
想一想哪里使用到了容量这个参数呢?
在拿到key的hash值,计算当前key在数组中的下标的时候,运用了如下的方法进行计算:
真实的length为16,我们假设一个假的lengthWrong = 15;
同时我们有两个key,hash之后拿到的hash=8,和hash=9;
length - 1
二进制
8 & length - 1
9 & length- 1
15
1111
1000 & 1111 = 1000 = 8
1001 & 1111 = 1001 = 9
14
1110
1000 & 1110 = 1000 = 8
1001 & 1110 = 1000 = 8
可以看到当长度为15时,当h = 8,h =9 h & length - 1 拿到的结果一样都为8,也就是这两个key都存在数组中下标为8的链表上。这是为什么呢?
当length为偶数时,length- 1位奇数,奇数的二进制最后一位必然为1,而当length = 奇数时,length - 1位偶数,偶数的二进制最后一位为0.
二进制与运算有如下规则:
1 2 1 & 任意 = 任意; 0 & 任意 = 0;
也就是说,当length = 16时,计算的下标可以为1-16任意数字,而当length=15时,计算的下标只能为2,4,6,8 等等偶数,这样就浪费了一般的存储空间,同时还增大了hash碰撞的概率,使得HashMap的性能变差。
因此length必须为偶数,而length为2的次幂不仅能保证为偶数,还可以实现h & length - 1 = h % length,可谓是一举两得了。666啊。
扩展(Java8 的hashMap有哪些改进?) 在3.2中提到,当极限情况下HashMap会退化成链表,存取时间复杂度变为O(n),这显然是不能接受的,因此在java8中对这一点做了优化。
在java7中,存储在数组上的是一个链表的头结点,当哈希碰撞之后,不断的增长链表的长度,这会导致性能下降。在java8中,引入了红黑树数据结构,当链表长度小于8时,仍然使用链表存储,而当长度大于8时,会将链表转化为红黑树。同时,当树的节点数小于6时,会从红黑树变成链表。
这样改进之后,即使在性能最差的情况下,hashMap的存取时间复杂仍为O(logn).
而红黑树的具体实现,这里不再详细叙述,这属于数据结构的范围了,在HashMap中展开不合适。
小bug 今天在编码过程中,对Map<Integer, String> 用long作为key去取值,结果自然是取不到的,但是代码并不报错.
1 2 3 4 Map<Integer, Integer> testMap = new HashMap <>(); testMap.put(1 , 1 ); Integer i = testMap.get((long )1 );System.out.println(i);
在装箱过后,会变成Long,实际取值时候的HashCode是不一样的,下面是Integer和Long的HashCode方法.
1 2 3 4 5 6 7 8 9 public static int hashCode (int value) { return value; } public static int hashCode (long value) { return (int )(value ^ (value >>> 32 )); }
所以不要忽略代码中的警告哦~并不是只有error才会导致错误.
完.
ChangeLog
2018-10-17 完成
2019-06-28 补充bug
以上皆为个人所思所得,如有错误欢迎评论区指正。
欢迎转载,烦请署名并保留原文链接。
联系邮箱:huyanshi2580@gmail.com
更多学习笔记见个人博客——>呼延十