lucene系列(三)DirectWriter源码分析

前言

本文学习下 Lucene 在存储大量整数时使用到的编码方法。

介绍

DirectWriter 用 bit 编码方式进行数组压缩的功能,它在整个数组的所有元素都不大的情况下能带来不错的压缩效果。

DirectWriter 是 Lucene 为整型数组重编码成字节数组的工具,它的底层包含一系列编码器,将整型数组的所有元素按固定位长度的位存储。它按 Bit 存储,预留长度过长会浪费空间,短了会因为截断导致错误。因此需要在数组中查找最大值,由它的长度作为存储的长度。

假设有一组数据{4,5,9,0},它们的二进制表示是{100, 101, 1001, 0}。占用有效位最长的是 1001(4 个 bit),因此需要用 4 个 bits 来表示一个数值,得到如下结果。

2021-01-24-20-44-53

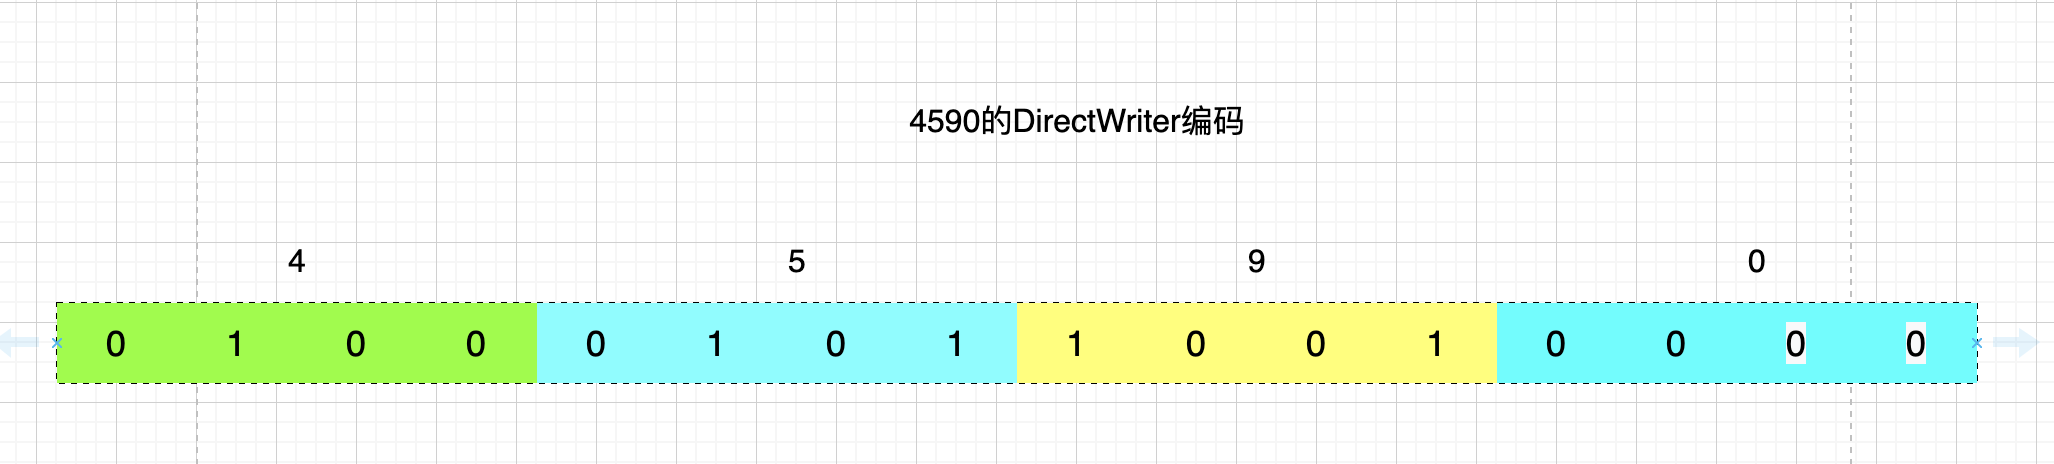
正好占用了 16 位,两个 byte 的数据。

由于 DirectWriter 在写完后会写入三个 byte 的 0 值,因此上面的数据写入文件之后,使用 xxd 命令查看文件内容为:

2021-01-24-20-49-08

很巧合有没有,使用十六进制读取文件,和我们的原始值竟然一样。其实是因为 16 进制每个进位是 4 个 bit, 正好和我们的数据一样而已。

源码分析

带有注释源码可以查看 org.apache.lucene.util.packed.DirectWriter

属性

1
2
3
4
5
6
7
8
9
10
11
12
13
14
15
16
17
18
19
20
21
22
23
24
25
// 每一个值需要几个 bit
final int bitsPerValue;
// 总数
final long numValues;
// 输出方
final DataOutput output;
// 当前写了多少
long count;
boolean finished;
// for now, just use the existing writer under the hood
// 当前写入了多少个,在 nextValues 里面的偏移
int off;

// 这两个是符合对应关系的,因此 nextValues.length * bitsPerValue = nextBlocks.length * 8
// 编码后的所有数据
final byte[] nextBlocks;
// 所有的原始数据,打算存这么多数字,每个数字用 bitsPerValue. 那么总共需要 nextValues.length * bitsPerValue.
// 这些都要存在 nextBlocks 里面,所以除以 8 就是 nextBlocks 的长度。
final long[] nextValues;

// 编码器
final BulkOperation encoder;
// 1024 内存能够缓存多少个完整的块。
final int iterations;

注释的比较详细,就不多少了。

构造方法

1
2
3
4
5
6
7
8
9
10
11
12
13
14
DirectWriter(DataOutput output, long numValues, int bitsPerValue) {
this.output = output;
this.numValues = numValues;
this.bitsPerValue = bitsPerValue;
// 因为你需要的位不一样,那么需要的顺序读写的编码器就不一样,为了性能吧,搞了很多东西
// 搞了很多个编码解码器,根据存储的位数不一样而不一样
encoder = BulkOperation.of(PackedInts.Format.PACKED, bitsPerValue);
// 这里计算一下的目的是,内存 buffer 尽量刚刚好用 1024 字节,不要太小,导致吞吐量降低,不要太大,导致 oom.
// 用 1024 字节的内存,能缓存多少个编码块。如果用不了 1024, 就只申请刚刚的大小。
iterations = encoder.computeIterations((int) Math.min(numValues, Integer.MAX_VALUE), PackedInts.DEFAULT_BUFFER_SIZE);
// 申请内存里的对应 buffer array.
nextBlocks = new byte[iterations * encoder.byteBlockCount()];
nextValues = new long[iterations * encoder.byteValueCount()];
}

interations

这里着重解释一下,属性中interations的作用。构造函数中对他的初始化也不是特别容易懂。

DirectWriter 是按照位对数字进行存储,那就有所谓的block(块)的概念。

设想下,你想让每个数字用 12 个 bit 存储。而且你只写入一个数字,也就是总共只用 12 位,这时候怎么办?还能向文件中写入 1.5 个字节么?因此,通过计算bitsPerValuebyte-bits=8的最小公倍数,来形成一个block概念。

比如每个数字使用 12 位存储,每个 byte 是 8 个 bit, 那么最小公倍数是 24, 也就是 3 个 byte 为一个 block, 用来存储 2 个 12 位的数字。
申请空间时,直接按照 block 为单位进行申请,如果能写满,就写满。写不满剩余的 bit 位使用 0 填充。

当你仅写入一个 12bit 数字时,实际上会写入三个字节,共 24bit. 前 12bit 是你的数字,后 12bit 用 0 填充。

那么直接按 block 进行写入不就完事了么?为什么需要interations参数呢?

众所周知,每次都写文件很慢,一般的写文件都使用内存进行 buffer. 缓冲一部分的数据在内存,等到 buffer 满了之后一次性写入一堆数据,这样可以提高吞吐量。

对于 DirectWriter 而言,buffer 多少个数据是个问题。因此每个数字可能是 1bit, 也可能是 64bit, 使用固定的数量来缓冲,内存占用很不稳定,差异可能达到 64 倍。一来占用内存不稳定,容易造成 OOM. 二来作为一个 Writer. 占用内存忽大忽小的,很不帅气。

因此 DirectWriter 使用固定大小的 buffer. 一般设定为 1024 字节。也就是 1KB 数据进行一次实际的写入磁盘操作。

上面说了,DirectWriter 写入数据必须按照 block 来写入,那么由于每个数字使用 bit 数量不同,block 的内存大小也是不确定的,1024 个字节能够包含多少个 block. 也是不确定的,需要根据bitsPerValue来进行计算,而不是可以直接定义成静态常量。

内存中缓冲一个 block. 需要:

  1. 保存原始数据。需要保存 byteValueCount个 long 型数据,占用内存为 byteValueCount * 8个字节。
  2. 保存编码后的数据。需要保存 byteBlockCount 个字节的数据。占用内存为:byteBlockCount.

那么 1024 个字节,能够 buffer 多少个 block 呢。1024 / (byteBlockCount + 8 * byteValueCount).

我们查看一下interations的计算方法。

1
2
3
4
5
6
7
8
9
10
11
12
13
14
15
16
17
18
19
20
21
22
23
24
25
26
27
28
29
30
31
32
33
34
35
36
37
38
39
40
41
42
43
44

/**
* For every number of bits per value, there is a minimum number of
* blocks (b) / values (v) you need to write in order to reach the next block
* boundary:
* - 16 bits per value -> b=2, v=1
* - 24 bits per value -> b=3, v=1
* - 50 bits per value -> b=25, v=4
* - 63 bits per value -> b=63, v=8
* - ...
*
* A bulk read consists in copying <code>iterations*v</code> values that are
* contained in <code>iterations*b</code> blocks into a <code>long[]</code>
* (higher values of <code>iterations</code> are likely to yield a better
* throughput): this requires n * (b + 8v) bytes of memory.
*
* This method computes <code>iterations</code> as
* <code>ramBudget / (b + 8v)</code> (since a long is 8 bytes).
*
* @param ramBudget : 每个 budget 的字节数?, 通常为 1024
*/
// Bulk 操作的时候,内存里面有 buffer. 这个 buffer 一共只有 1024bytes.
// 但是有两个变量。
// 注意:这里是算内存的,也就是算,1024 个 byte 的内存,够干啥。当然同时要满足 pack 本身的要求。
// 也就是 一个块要能正好写到边界,别多了少了 bit 位。
public final int computeIterations(int valueCount, int ramBudget) {
// 1024 个字节的内存。有两个变量,都要用。
// 1. 原始数据。一个完整的块,要 byteValueCount() 个原始数据,每个数据用 long 存储。所以一个完整的块,要 8 * byteValueCount() 个字节。
// 2. 编码后的数据。一个完整的块,要 byteBlockCount() 个字节。
// 所以 iterations. 代表的是,1024 个字节的内存,够缓存多少个完整的块。
final int iterations = ramBudget / (byteBlockCount() + 8 * byteValueCount());
// 至少缓存一个
if (iterations == 0) {
// at least 1
return 1;
// 块的数量 * 每块里面原始数据的数量 > 你要存储的总数,也就是说,总共也用不了 1024 字节,申请多了。
} else if ((iterations - 1) * byteValueCount() >= valueCount) {
// don't allocate for more than the size of the reader
// 所以只缓存,(总共要存的数量 / 每块里面能存的数量 ) 个完整的块。因此总共也用不完 1024 字节嘛
return (int) Math.ceil((double) valueCount / byteValueCount());
} else {
return iterations;
}
}

可以看到和我们分析一致。

因此,当你需要写的数据很多,DirectWriter 类内部nextValuesnextBlocks两个属性总共占用的内存,应该很接近于 1024bytes.

add 方法

1
2
3
4
5
6
7
8
9
10
11
12
13
14
15
16
17
18
19
20
21
/** Adds a value to this writer
* 添加一个值
*
*/
public void add(long l) throws IOException {
// 几个校验
assert bitsPerValue == 64 || (l >= 0 && l <= PackedInts.maxValue(bitsPerValue)) : bitsPerValue;
assert !finished;
if (count >= numValues) {
throw new EOFException("Writing past end of stream");
}

// 当前缓冲的数量,够了就 flush
nextValues[off++] = l;
if (off == nextValues.length) {
flush();
}

count++;
}

比较简单,将要添加的 long, 写进内存中的数组里,之后检查 buffer 是否满了,满了就写一次磁盘。调用 flush 方法。

flush 方法

1
2
3
4
5
6
7
8
9
10
11
12
13
14
private void flush() throws IOException {
// 把当前缓冲的值,编码起来到 nextBlocks
// 当前缓冲的在 nextValues,把他按照编码,搞到 nextBlocks 里面
// 反正就是存储啦,编码没搞懂,草
encoder.encode(nextValues, 0, nextBlocks, 0, iterations);

final int blockCount = (int) PackedInts.Format.PACKED.byteCount(PackedInts.VERSION_CURRENT, off, bitsPerValue);
// 写入到磁盘
output.writeBytes(nextBlocks, blockCount);
// 缓冲归 0
Arrays.fill(nextValues, 0L);
off = 0;
}

把当前缓冲的原始数据值,调用 encoder 进行编码,按照 bitsPerValue 编码后,写入输出文件。

finish 方法

在所有数据写完之后,buffer 可能有一些不满的数据,要调用 finish 进行处理。

1
2
3
4
5
6
7
8
9
10
11
12
13
14
15
16
17
/** finishes writing
*
* 检查数据,检查完最后一次 flush 掉
*/
public void finish() throws IOException {
if (count != numValues) {
throw new IllegalStateException("Wrong number of values added, expected: " + numValues + ", got: " + count);
}
assert !finished;
flush();
// pad for fast io: we actually only need this for certain BPV, but its just 3 bytes...
for (int i = 0; i < 3; i++) {
output.writeByte((byte) 0);
}
finished = true;
}

首先进行了一些参数的 check. 然后把当前内存里 buffer 的数据调用 flush 写入磁盘。之后写入了 3 个字节的 0 值。具体用来做什么,未知。

总结

它对一个整数数组进行编码,之后写入文件。

它使用数组中最大的数字需要的 bit 数量进行编码。因此在数组整体比较小,且标准差也很小的时候(就是最大的别太大), 可以起到不错的压缩写入效果。

阅读源码需要注意的是,DirectWriter 在内存中进行了 buffer. 不论你的数据集是什么,都使用固定的 1024byte 进行 buffer. 因此有一些针对 buffer 大小的计算需要了解下。

此类为写入方,具体的读取方:org.apache.lucene.util.packed.DirectReader, 虽然有一些代码组织上的不同,但是底层思想是一样的,就不再赘述了。


完。

联系我

最后,欢迎关注我的个人公众号【 呼延十 】,会不定期更新很多后端工程师的学习笔记。
也欢迎直接公众号私信或者邮箱联系我,一定知无不言,言无不尽。


以上皆为个人所思所得,如有错误欢迎评论区指正。

欢迎转载,烦请署名并保留原文链接。

联系邮箱:huyanshi2580@gmail.com

更多学习笔记见个人博客或关注微信公众号 < 呼延十 >——>呼延十